![]()
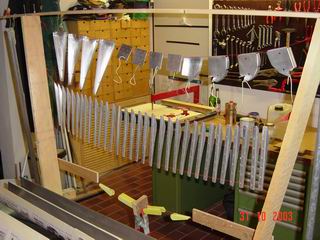
At this time the wings are finsihed except the bottom main skins, so it was time to build the elevators and flaps. The main problem here is to align these components on the wing. Misalignment will show, and it's bad for appearance and even worser for the flying characteristics of your ship. The plans show some completely different methods of aligning ailerons and flaps, so you have to decide what fits your needs. Most builders choose the female airfoil method: You fabricate a female airfoil by cutting out the shape of the airfoil from wood and slip it over the wing. This will help you to center the aileron an flap on the rear spar. I've decided to go another way: At first I've tried to eliminate as much variables as possible, as there were: Position of the aileron brackets, positon of the bolthole where the aileron bracket mounts to the aileron arm on the rear spar, position of the bolthole in that arm an finally the position of the aileron arm itself. Each of these postions affects the position of the mounted aileron, too much to handle at once for me. If you drill the aileron brackets to the aileron per plan and drill the hinge pin (bolt)hole also per plan (1 5/8 below the ailerons chordline) you have eliminated most of the variables and have'nt drilled any hole to the aileron arm or the rear spar. Now you use the method of lining up the toolingholes of the wings ribs and the aileron itself. These holes have to be in line! This is easy to do at the wings tip. I've installed rivnuts into the toolingholes and screwed in some bolds to extend the toolingholes over the overlapping mainskins of the wing. Now I clamped the outboard aileron attachment arm to the rear spar of the wing and ran a thread around all 4 bolts from top to bottom and back. Now I only had to shift the arm fore and back until the therad touches all bolts on both sides, and here you are! (It is neccessary to file down the W-413 and W-414 aileron attachments down a little, if they touch the rear spars flange). It will be clearer if you look at the images below. Of course most of this is not my brainchild, it's from Paul McReynolds and you can read the whole procedure in the '21 years of RVator'. That's a collection of builders tips from the factorys newsletter 'RVator' and I highly recomment it to all builders, a lot of precious information. Once you have the position of the outer aileron attachment, you can clamp the center attachment bracket in place by simply eyeing the gap between the wings skin and the aileron, you will do that more precisely later. Now I've fixed the aileron in it's neutral position and was able to repeat this with the partial assambled flap. Here you have to be careful, the flaps inner rib is not at 90 degrees to the falps skin because of the actuator arm, so take care. The flap is not completed as the aileron was, and there is a reason for that. If you don't drill the top skin to the rest of the flap, you can hang the assembled and clecoed flap bottom to the wing and slip the flaps top skin in place, shifting it until the top ends of your aileron and flap are leveled. Now you can drill a reference hole into both flapskins, take off the flap and complete it. Now the flap goes back on the wing and the positon of the flap brace will be found by using the same thread and rod method as the aileron was. Now the outside end of the aileron and the inside end of the flap are fixed, and if you run a taut thread from end to end on top of both components and align the center of both, it's done. |
|
 Prime time
;o) Prime time
;o) |
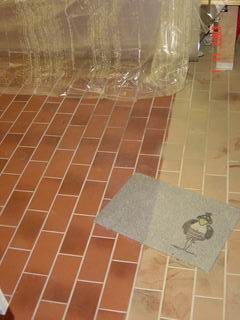 It's much
better to do that priming in summer. I always did it
outside, but this is November and the temperatures
dictate to do it in the shop. I had some foil on the
left, but on right....My precious, highly payed Chromate
on the floor, what a waste, sniff...This does'nt stick to
the floor, you can wipe it off, but it's a mess. I had to
seal the door, it finds the way into our house, there is
only one door between the shop and our living room. It's much
better to do that priming in summer. I always did it
outside, but this is November and the temperatures
dictate to do it in the shop. I had some foil on the
left, but on right....My precious, highly payed Chromate
on the floor, what a waste, sniff...This does'nt stick to
the floor, you can wipe it off, but it's a mess. I had to
seal the door, it finds the way into our house, there is
only one door between the shop and our living room.I found out, that the cheapest airbrush gun (venturi type) is the best tool for little sessions like this. They are easy to clean and cheap to replace. My professional spaygun takes twice or more to clean and the result is more than enough for priming parts with this cheap gun. |
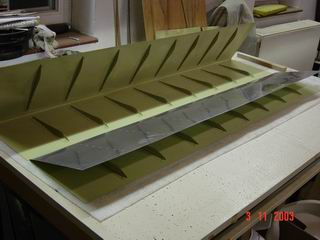
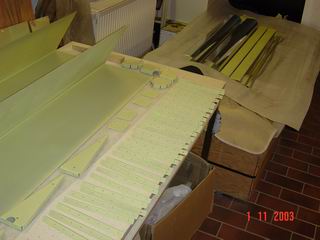 Here you
see all parts for both ailerons, drilled, dimpled and
painted, ready to rivet them together. Here you
see all parts for both ailerons, drilled, dimpled and
painted, ready to rivet them together. |
 The
sequence of back-riveting the stiffners to the skin: The
sequence of back-riveting the stiffners to the skin:1.: Load a row of rivets |
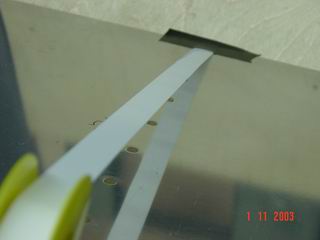 2.: Tape
it from the rear. (This is not a special tape for this
task, it's for sealing pipe-fittings, but it's excellent
for this job) 2.: Tape
it from the rear. (This is not a special tape for this
task, it's for sealing pipe-fittings, but it's excellent
for this job) |
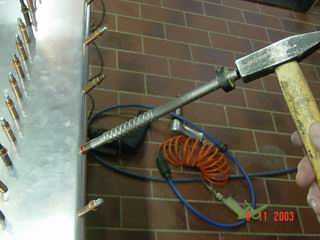
 3.: ..and
rivet the stiffner with the C-frame tool. Note the steel
plate under the skin. This works great and you don't have
to fire with the gun on this very thin skin. 3.: ..and
rivet the stiffner with the C-frame tool. Note the steel
plate under the skin. This works great and you don't have
to fire with the gun on this very thin skin. |
 The skin
in front is already squeezed together, the rear one comes
next. The skin
in front is already squeezed together, the rear one comes
next. |
 The skin
is only prebent for better access while you rivet the
stiffners, so you have to squeeze it down to shape after
that. This is done with this homemade tool (2 pieces of
wood screwed together with piano hinge), until the shape
of the bent correspondences with the rib. (Rib assembly
is removed for squeezing, of course) The skin
is only prebent for better access while you rivet the
stiffners, so you have to squeeze it down to shape after
that. This is done with this homemade tool (2 pieces of
wood screwed together with piano hinge), until the shape
of the bent correspondences with the rib. (Rib assembly
is removed for squeezing, of course) |
 Fitting
the skins. I riveted all that in this position. As you
see on the left, I screwed the whole assembly to my bench
with some angles, so I've tried to keep the aileron
straight. Then I inserted the water pipe and riveted it
all together.(The other side is done already) Fitting
the skins. I riveted all that in this position. As you
see on the left, I screwed the whole assembly to my bench
with some angles, so I've tried to keep the aileron
straight. Then I inserted the water pipe and riveted it
all together.(The other side is done already)A jerk would remove the fixing angles after that, pleased with the result, drink some beer and look at this great, straight, shiny aileron. A jerk? Scroll down, please..... |
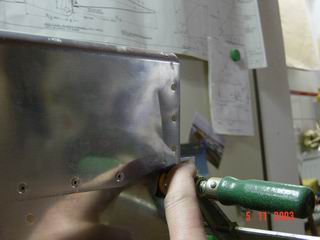
 There is a
waterpipe running down all the way at the front end for
propper balance, and you have to countersink that pipe
and dimple the skin, to set some poprivets (boo..) here.
This caveman method worked great: Take that C-frame rod,
insert a proper die and bang! The heavy pipe serves as a
female die ;o) There is a
waterpipe running down all the way at the front end for
propper balance, and you have to countersink that pipe
and dimple the skin, to set some poprivets (boo..) here.
This caveman method worked great: Take that C-frame rod,
insert a proper die and bang! The heavy pipe serves as a
female die ;o) |
 Holy ****!
There was no water pipe when I srewed that down to the
bench. It's for balance, so after installing that pipe
the aileron was hanging over the bench only 20% as
before, but these 20% are the heavy end by now, so while
I've turned away for the beer: BOOM! Holy ****!
There was no water pipe when I srewed that down to the
bench. It's for balance, so after installing that pipe
the aileron was hanging over the bench only 20% as
before, but these 20% are the heavy end by now, so while
I've turned away for the beer: BOOM!The aileron was lying on the floor, and I thought I had to throw it away. In fact the only major thing was this bow where it hit the rivet gun (see picture before, you see that chaos on the floor? It saved this aileron, because it bounces on the pressure hose and my right foot and both left no dings). Some bondo and it will be gone. Some days it's hard to proceed, believe me. |
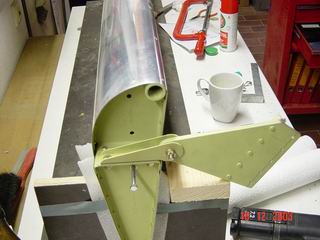 The
aileron bracket is drilled to the aileron and drilled and
bolted to the attachment arm. I've done this on both
sides before I've drilled any further hole and it worked
great. You can see the 'tooling hole extension bold' in
the ailerons rib. Now there are only two points to align
on the wing, the W-413 and W-414 brackets. The
aileron bracket is drilled to the aileron and drilled and
bolted to the attachment arm. I've done this on both
sides before I've drilled any further hole and it worked
great. You can see the 'tooling hole extension bold' in
the ailerons rib. Now there are only two points to align
on the wing, the W-413 and W-414 brackets. |
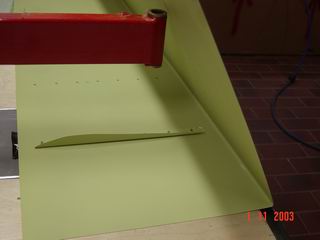
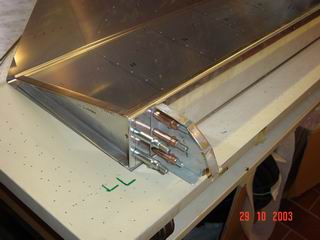
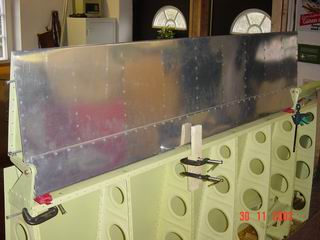 Aileron
clamped to the wing. Now it's time for the taut thread
around the tooling hole bolts. Aileron
clamped to the wing. Now it's time for the taut thread
around the tooling hole bolts. |
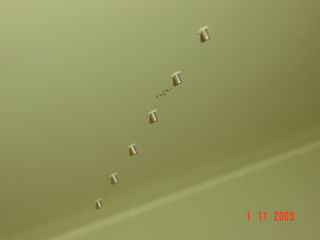
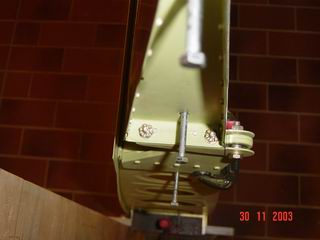 Here you
see the line of bolts, the wings chord line. If all bolts
are on one line, you can drill the aileron arm (bracket). Here you
see the line of bolts, the wings chord line. If all bolts
are on one line, you can drill the aileron arm (bracket). |
 The thread
touches all bolts and the bracket is clecoed on. This is
the first fixpoint, to get the other I had to build the
flap first, so jump to the flap/final assembly page. The thread
touches all bolts and the bracket is clecoed on. This is
the first fixpoint, to get the other I had to build the
flap first, so jump to the flap/final assembly page. |
 Here you see the first fit of the aileron
spar and rib to the skin. I had a lot of work with the
nose ribs, they have to be curved, maybe they are in
todays kits, haha
Here you see the first fit of the aileron
spar and rib to the skin. I had a lot of work with the
nose ribs, they have to be curved, maybe they are in
todays kits, haha