![]()
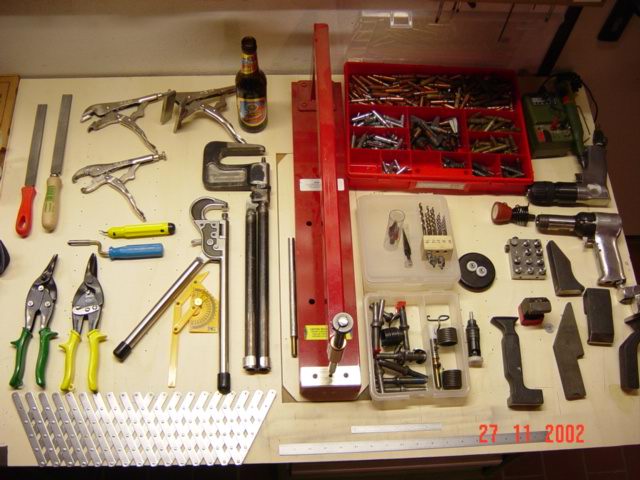
| Here you get a short overview of tools, which
probably are not in stock in a normal workshop, without
which one however does not get along.
Unfortunately one hardly gets such things here in Germany, therefore you have to order it in the USA. Often it is more favorable to assign an
acquaintance who orders it and let it then passes on as a
gift. The 2 most well-known companies specialized in tools for the RV's are I (Klaus did it for me, grin) ordered my tools at Avery's and we had no trouble at all. Here again thanks to Klaus Heddergott. He lives in Mariposa, CA, built a beautiful RV6 and was my contact man in the States. Without him I would not have begun.... A friendship, which has begun by Doug Reeves very good
Homepage. Let's go to the tool wonderland! |
 Metrical? Metrical? Forget
it, here you have to work with inches. The angle finder is a cheap one from a general toolstore, however more than sufficient. |
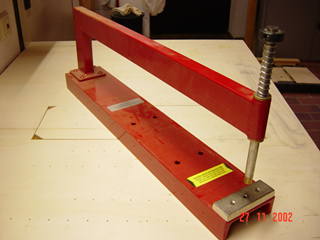
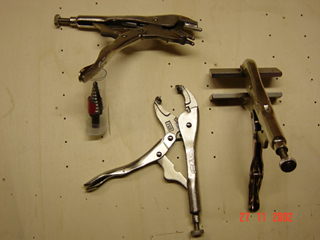
2 of them are good, one is enough. The depth of the throat is important. I rather work with the handsqueezer than with the rivet gun.. The danger of scrapproduction is much smaller. Therefore it is important, that the head has a deep opening, in order to press rivets, which are not on the edge of the sheet metal. You can get the heads singly, so you will come along with one squeezer. |
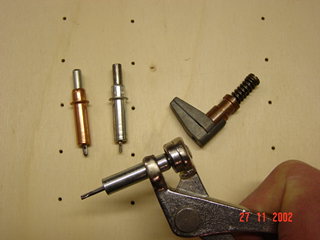
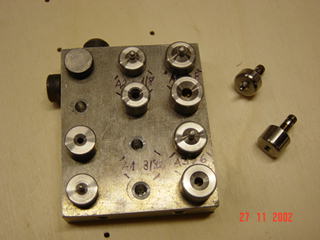 Dies for
the rivetsqueezer! Dies for
the rivetsqueezer!You need 3 kinds: Replacement cannot harm, because without it one's lost. |
 The loud
pneumatically operated alternative to the rivet squeezer: The loud
pneumatically operated alternative to the rivet squeezer:
Compressed air rivet gun! Works like a pneumatically chisel. There are different insets, with which you can strike all kinds of rivets (and you have to, because some places can't be reached with the handsqueezer) A teasing trigger is important, a digital on/off knob forces scrap-production. |
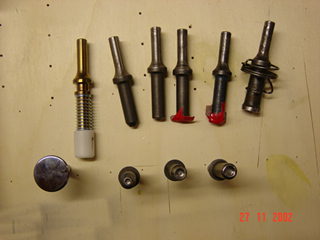 These are
the insets for murderer equipment above. These are
the insets for murderer equipment above.The left one with the white plastic shroud is important, with this one you can strike rivets from the rear (on the shop head), it's necessary during riveting the stiffeners to the skin of the rudder and elevators. These insets are available for all kinds of rivets and rivet heads. A Builders Toll Kit from Companies mentioned above contains everything you need. |
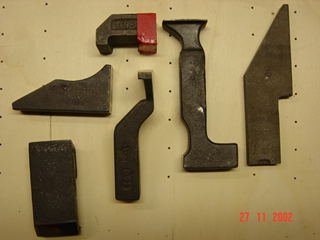 The
counterpart to the rivet gun: The
counterpart to the rivet gun: Bucking bars in all forms. (Credits to Isenbürger Aviation Inc.) They are the counterweight on the other side, if the rivet gun strikes the rivet. Exotic forms, but there are also exotic places to reach. The form, which fits, never participates, amusing... |
 Indispensably:
C-frame Tool Indispensably:
C-frame Tool A mixture of hand squeezer and gun, rather an oversized squeezer head, you've got to strike it with a hammer or the gun. Also suitably for very large parts. To use for dimple the skin as well as for striking rivets. It uses the same dies used with the hand squeezer. |
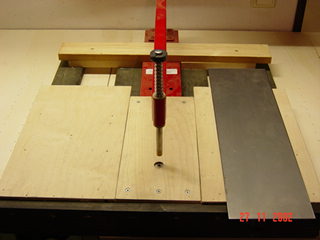 Here is
guaranteed, that the insets always meet one on the other
in the angle of 180 degrees. Here is
guaranteed, that the insets always meet one on the other
in the angle of 180 degrees. Rivet guns and bucking bars sometimes work different.... To recommend much: Supported by the built wood construction the workpiece is on the correct height. The piece in the middle can be exchanged by the steel plate, so ' back riveting ' is also possible. ( The ordinary way to rivet means to strike the factory head with the gun, while at back-riveting the gun fires on the shop head and the factory head is supported by a steel plate) A must! |
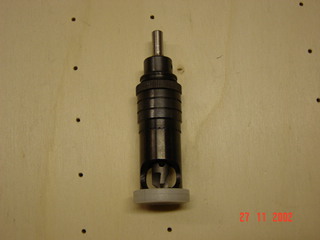 The
countersink cage. The
countersink cage. At some places it is impossible to dimple with the hand squeezer. If the material is thick enough the cage can be used. It can be equipped with different countersink cutters and has an adjustable depth stop. Here the material is not deformed but it is removed. |
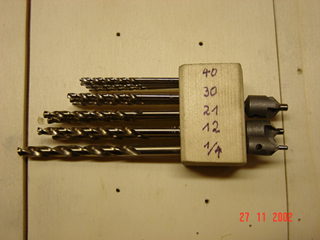 Drills and
countersink cutters. Drills and
countersink cutters. To order along is the best, since these sizes are not available here in Germany. As mentioned: forget metric ;-) |
 If then
everything is bored, dimpled and so on, it must be
arranged. If then
everything is bored, dimpled and so on, it must be
arranged. The upper pliers press small flutes in ribs. By the compression moulding at Van's the ribs are easily arc-shaped. With this pliers you squeeze little notches into the flange in order to arrange the web flat. The one in the middle got dimples welded on, so you can reach rivets for which the hand squeezer is too big. The right pliers are for smoothing and bending the sheet metal. Note: Pliers from the automotive sector are too sharp edged to be suitable!! |
 All
boreholes must be deburred, all edges rounded and all
interior corners must have a radius. All
boreholes must be deburred, all edges rounded and all
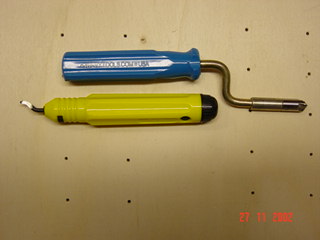
interior corners must have a radius.These 2 tools are simple, but good. The blue part is for deburring boreholes. With the yellow one you can take off the sharp edges from sheet aluminum, so that finishing the parts with a Scotchbrite wheel or sandpaper will go faster and the wheel also will last longer. |
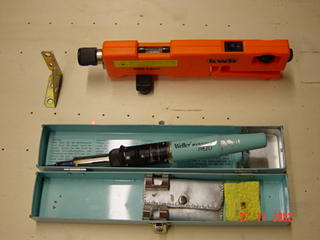
 Oh,
drilling: Oh,
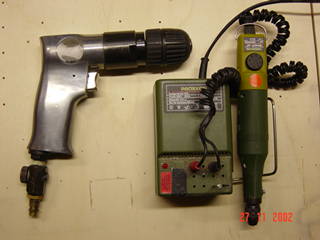
drilling: A compressed air drill press is necessary. A teasing trigger is desirable also. Watch that! Mine is one of those on/off ones, I hate it. All holes should be pre-drilled, a small Proxxon or Dremel is indispensable according to my opinion. There are thousands of holes, and a 1,5mm-drill in a 1 lb air drill does not make fun. |
 On top a
Desoutter/CP angle drill. Not a must have but handy in
tight spots and more practical than a cheap angle drill
attachment. Don't think of buying this thing new,
unaffordable (Or, in other words, you need it for 50
holes on the RV, and every hole would be 10$ minimum. I
bought it at EBAY's for less than 60 Euros).The other
thing is a whoknowswhat, buy I've cutted all skins and
angles with it. It works with Dremel cutting disks and
makes 40000 and more rotations a minute. Very good, my
most used tool, but the bits and pieces of torn disks are
very dangerous, safety goggles are a must with it. On top a
Desoutter/CP angle drill. Not a must have but handy in
tight spots and more practical than a cheap angle drill
attachment. Don't think of buying this thing new,
unaffordable (Or, in other words, you need it for 50
holes on the RV, and every hole would be 10$ minimum. I
bought it at EBAY's for less than 60 Euros).The other
thing is a whoknowswhat, buy I've cutted all skins and
angles with it. It works with Dremel cutting disks and
makes 40000 and more rotations a minute. Very good, my
most used tool, but the bits and pieces of torn disks are
very dangerous, safety goggles are a must with it. |
 Cleco's!!!! Cleco's!!!!These little devils hold the pre-drilled parts together, until they are replaced by rivets. 350 pieces of 3/32"and 200 pieces 1/8" will do the job. The part completely right is a kind of fastening clamp for the Cleco pliers, 20 pieces are sufficient. Purchase it in USA, at Friebe Aircraft Supply here in Germany they cost the quadruple. There is no ' too much' here, however the indicated quantities should be enough . |
 Things,
which do not stand anywhere (however they are good fto
have): Things,
which do not stand anywhere (however they are good fto
have):A gas soldering iron! All sheet metals are plastic-coated. This plastic should not be removed before the part is finished. But it has to be removed BEFORE dimpling and riveting. A line left, one right, and a narrow strip already can be taken off . The remainder of the sheet metal is protected up to the end from scratches! Laser level with a 90 degree split-lens: You can buy it in the for 15 euro/dollar and it will help you a thousand times. Either you screw it on the ceiling exactly on top of the mounting jig and you can align all parts, without building wild-looking and bad-working auxiliary constructions, or it is screwed to the wall, ameasure horizontally over the whole construction unit. If 2 pieces are installed in this kind, a ' getaway from alignment' is nearly impossible. Simply turn, and a red point moves over the skeleton! |
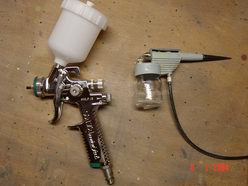 Priming
is done with these two spay guns. The right one is a el
cheapo one from Revell, but it's the best choice for
little batches, because the result is pleasing and it's a
snap to clean that one. The other one is the worldfamous
SATA Minijet HVLP for the bigger tasks, this is the best
gun money can buy, but that's what the guys at SATA know
also, so be prepared to spent a little money. This one
works for finishing paint and priming, all you need is a
different nozzle. Priming
is done with these two spay guns. The right one is a el
cheapo one from Revell, but it's the best choice for
little batches, because the result is pleasing and it's a
snap to clean that one. The other one is the worldfamous
SATA Minijet HVLP for the bigger tasks, this is the best
gun money can buy, but that's what the guys at SATA know
also, so be prepared to spent a little money. This one
works for finishing paint and priming, all you need is a
different nozzle. |
 Finally
something, which does not have to be imported! (Sorry,
US-readers, you have to..) Finally
something, which does not have to be imported! (Sorry,
US-readers, you have to..)Indispensably! Liquid building assistance. At higher dosage also a translation assistance during the reading of the building manual. The lable can be adapted to the local conditions and hasn't any influence on the later flight behaviour...... |
| Not in the picture, but necessarily: The Scotch
Deburing wheel, a plastic-bound grinding wheel for a
normal table whet-stone. All edges can be smoothed in the
shortest time. With 50$ not completely cheaply, but very
effectively. Without a electical benchgrinder naturally
jokeless, thus: Benchgrinder, taiwan quality is enough,
not under 300 Watts. A compressor is naturally a
condition for the pneumatic tools. Here the boiler size
is important. Compressed air drills are
"Air-eaters" but only used a short time.
However there is always something to be primed with a
spraygun, so the compressor should be already quite good.
A water separation is necessary. ALL compressors are loud
as thunder, but some still louder: So, do a test run with
the dealer and then install in another room. You still
will get aggressive while building sometimes, no need to
force it with one of those power-to-noise-converters. All in all, you won't get anything too much, if you buy one of those Builders Tool Kits from a company like Avery or Cleaveland, so bite the bullet and spend the money. Enjoy building! And, don't ever think of building an aircraft, it makes you mad. Take it as building aircraft parts, one after the other, and, if all parts together will lift you in the clear blue sky someday, that's real endurance. |
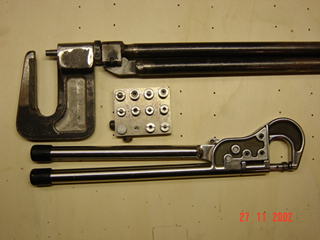 Rivet squeezers!