![]()
 I decided to build
both wings simultaniously, and if your shop size will
fit, do it also. It saves some time, because you will
forget how you managed to do the things on your first
wing when you're at the second one, believe me. There are
still some things to drill or to align, where you have to
scratch your head a lot before you finally find a way to
do that. 4 month later you will not know how it worked
out the first time. In fact I did'nt do everything on
every rib for both sides together, but when I finished a
major step on the left wing, I turned to the other one
and did the same step. I did the following: I decided to build
both wings simultaniously, and if your shop size will
fit, do it also. It saves some time, because you will
forget how you managed to do the things on your first
wing when you're at the second one, believe me. There are
still some things to drill or to align, where you have to
scratch your head a lot before you finally find a way to
do that. 4 month later you will not know how it worked
out the first time. In fact I did'nt do everything on
every rib for both sides together, but when I finished a
major step on the left wing, I turned to the other one
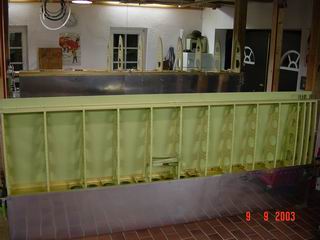
and did the same step. I did the following: 1.: Level both spars to the jigs. 2.: Drill all main ribs to one wing, matchdrill the leading edge ribs to the same wing and assemble and drill the rear spar to that wing. 3.: Repeat that for the other side. 4.: Fit and drill the top main and leading edge skin to one wing, fit the tank, then to the same with the second wing and so on. This worked good, I have never been too far away in mind, so it was easy to repeat all the steps on both wings. Beside that, it will be very frustating if you have one wing done and start with the other at zero. At that point you know how much work will come, but your mind will tell you that you're not building a new part, because you've done all that before, I mean, there is no finish line you're heading for, because you know how it will look. Priming is another timesaver if you build both wings, simply because you only have to prime all pieces for both wings at one time. There are some other things to speed up the process as Sam Buchanan told us on his homepage (look at it, you will find the link on Van's homepage!): Hit the shop door running and you can't get good results when the shop is in a state of chaos. Build all components 'mentally' at work or elsewhere, so you know exactely where to start when you fire up the compressor, staring at pieces of aluminium is not effective shoptime, searching for tools also is'nt. Sam, you're right! |
|
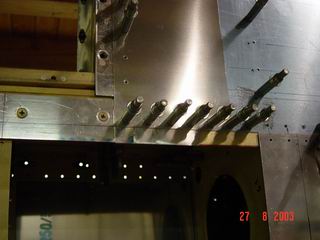
 Here you
see the reinforcing angles between the main ribs and main
spar, they're rivited to the ribs and bolted and riveted
to the spar, a lot of them together with the leading edge
ribs, so you have to matchdrill the main ribs and the
leading edge ribs. A good metod is shown on the next
image. Here you
see the reinforcing angles between the main ribs and main
spar, they're rivited to the ribs and bolted and riveted
to the spar, a lot of them together with the leading edge
ribs, so you have to matchdrill the main ribs and the
leading edge ribs. A good metod is shown on the next
image. |
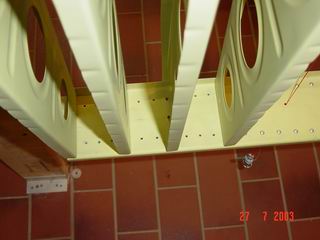
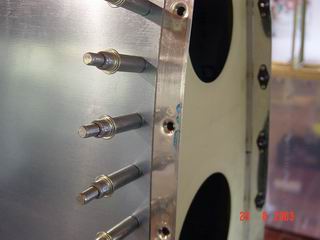
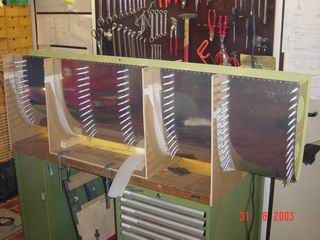
 You have
to know that all tooling holes in all ribs of
the wing are in line, so you simply have to draw a line
on your workbench and line up the tooling holes of the
main and LE ribs. To be sure the skin will run smoothly I
used some strips of aluminium to simulate the skin and
clamped them to the ribs, as you can see. the holes in
the main ribs are already there, so you drill right
though into the nose ribs and they align. (There is one
rivet going through the rib, the spar and the other rib
later) You have
to know that all tooling holes in all ribs of
the wing are in line, so you simply have to draw a line
on your workbench and line up the tooling holes of the
main and LE ribs. To be sure the skin will run smoothly I
used some strips of aluminium to simulate the skin and
clamped them to the ribs, as you can see. the holes in
the main ribs are already there, so you drill right
though into the nose ribs and they align. (There is one
rivet going through the rib, the spar and the other rib
later) |
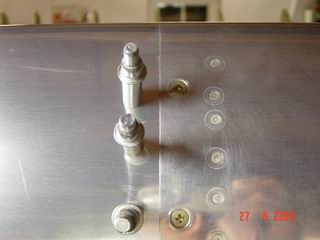
 Here is a
closer shot. As you see, I had drilled holes into the
bench and secured the ribs with rivets through the
tooling holes, this helps because there are a lot of
rib-pairs to drill. With these ribs you are really
starting a mass production while straightening, fluting,
drilling, deburring, dimpling and priming, so it's worth
the extra affort when you have a lot of similar pieces. Here is a
closer shot. As you see, I had drilled holes into the
bench and secured the ribs with rivets through the
tooling holes, this helps because there are a lot of
rib-pairs to drill. With these ribs you are really
starting a mass production while straightening, fluting,
drilling, deburring, dimpling and priming, so it's worth
the extra affort when you have a lot of similar pieces. |
 Scuffing
all ribs with scotchbrite, a neverending and dumb work. Scuffing
all ribs with scotchbrite, a neverending and dumb work. |
 After
priming the skeleton was clecoed together. There are some
doublers and bars to be riveted on the rear spar, but you
have seen that at the horizontal stabilizer. But there is
one important think to take care off, and thats not
pointed out clearly in the plans: You have to rivet the
aileron gap seal and the flapbrace to the rear spar
later, so figure out where it will go and use flush head
rivets for attaching the ribs at places, where you have
to rivet these things, otherwise you have to drill holes
in the brace and seal to get a place for the rivet heads. After
priming the skeleton was clecoed together. There are some
doublers and bars to be riveted on the rear spar, but you
have seen that at the horizontal stabilizer. But there is
one important think to take care off, and thats not
pointed out clearly in the plans: You have to rivet the
aileron gap seal and the flapbrace to the rear spar
later, so figure out where it will go and use flush head
rivets for attaching the ribs at places, where you have
to rivet these things, otherwise you have to drill holes
in the brace and seal to get a place for the rivet heads.You see 4 ribs here, the 3 on left with flanges facing to the left and the other one facing right. The rest of the ribs also face right, thats outwards on the wing. If you plan to rivet the top skins first, remember NOT to rivet the 3 innermost ribs to the spars, you have to pull them out when both skins are on and rivet one after the other. There are many ways to rivet on the skins, the manual says to start with the bottom main skin and rivet the top skins at last. For practical reasons this is logical, because the top flange of the rear spar faces backwards, so you are able to rivet that row from the outside. I decided to rivet the top side first, because you show that side to the world and I think you will get better results if the bucker can reach and SEE all rivets. The disadvantage is that you have to rivet the rear spar to skin rivetline blind when you rivet the bottom skins, but it works. If you don't rivet the 3 innermost ribs as mentioned above, you can avoid blind rivets and take AN's instead. |
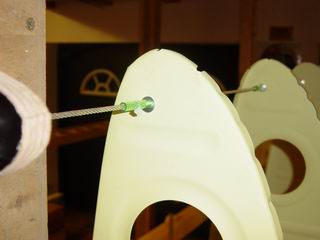 There is
an easy way to line up the LE ribs: Pull a steel wire
through all the lightening holes and put a washer and
close fitting tube on every side of each rib, square the
ribs and secure the plastic tube with a cable strap. The
leading edge skin will be wrapped around these ribs and
you don't want the ribs to move when you drill through
the skin. There is
an easy way to line up the LE ribs: Pull a steel wire
through all the lightening holes and put a washer and
close fitting tube on every side of each rib, square the
ribs and secure the plastic tube with a cable strap. The
leading edge skin will be wrapped around these ribs and
you don't want the ribs to move when you drill through
the skin. |
 But at
first you have to measure out and predrill the rivet
holes for the top main skins, if you prefer the skinning
sequence I did: Top main, leading edge, fit tanks, bottom
main. Doing so, you will achive truely straight
buttjoints between main and LE skin, because you simply
use the skin as it is delivered, without filing.
(Jurassic kit, he?? If you plan to start, don't worry,
today these skins are predrilled) But at
first you have to measure out and predrill the rivet
holes for the top main skins, if you prefer the skinning
sequence I did: Top main, leading edge, fit tanks, bottom
main. Doing so, you will achive truely straight
buttjoints between main and LE skin, because you simply
use the skin as it is delivered, without filing.
(Jurassic kit, he?? If you plan to start, don't worry,
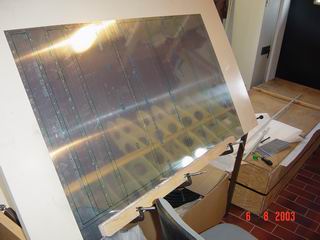
today these skins are predrilled)I have done it this way: Predrill the row where the skin is riveted to the main spar (take care not to drill holes where you can't set a rivet, watch closely where the ribs and stiffeners are and avoid these places to drill holes!!) Then clamp or tape the skin to the main spar, drill through the predrilled holes into the mainspar, starting at center of sheet, go outwards to both ends (one left, one right, one left..) clecoe as you go and then pull the skin flat down on the ribs all the way down to the rear spar. Now you can mark the positions of all ribs from behind. Take off the skin, draw square lines inbetween the markings and lay out the rivet pattern. (I fabicated a strip of allumium with the correct spacing for the main and LE ribs, so you can trace it to all rivetlines and get evenly spaced rows.) Predrill these holes and hang the skin back on the skeleton. Now you can drill all the way down to the rear spar and watch the centerline on the ribs through the predrilled holes. This procedure works for all skins and the risk of missing a rib is zero. The picture shows the backside of a main skin marked with contours of all ribs and rivet holes predrilled. |
 This is
how it looks after drilling to the skeleton. Repeat this
for the inboard top main skin and you are ready to fit
the leading edge skin. This is
how it looks after drilling to the skeleton. Repeat this
for the inboard top main skin and you are ready to fit
the leading edge skin. |
 Here you
need assitance. If someone pushes the skin down to the
ribs on the top side, you are able to peel back the skin
from below and mark the rib contours from behind. There
is no need to repeat this for the bottom side, because
the ribs have to be square to the spar, so you just have
to draw the lines square to the skin over to the bottom
side. Now you can predrill all holes except the row where
the skin will be riveted to the main spar on the bottom
side. Leave these out for safety, maybe you have to trim
off a little skin to end up in line with the main spar.
Drill that row after the skin is clecoed to the LE ribs. Here you
need assitance. If someone pushes the skin down to the
ribs on the top side, you are able to peel back the skin
from below and mark the rib contours from behind. There
is no need to repeat this for the bottom side, because
the ribs have to be square to the spar, so you just have
to draw the lines square to the skin over to the bottom
side. Now you can predrill all holes except the row where
the skin will be riveted to the main spar on the bottom
side. Leave these out for safety, maybe you have to trim
off a little skin to end up in line with the main spar.
Drill that row after the skin is clecoed to the LE ribs. |
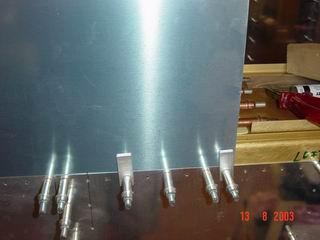 Use little
pieces of thick aluminium and cleco them to the main skin
to spar line, they hold down the LE skin. Use little
pieces of thick aluminium and cleco them to the main skin
to spar line, they hold down the LE skin. |
 Now you
can strap down the skin to the ribs, using some wood to
press the skin to the ribs. Start drilling at the
buttjoint at the top main skin and work up around the
nose down to the bottom side, clecoing every hole, left
to right and back, row after row. Now you
can strap down the skin to the ribs, using some wood to
press the skin to the ribs. Start drilling at the
buttjoint at the top main skin and work up around the
nose down to the bottom side, clecoing every hole, left
to right and back, row after row. |
 This is
how it looks after drilling. (some straps and clecoes
removed already). This is
how it looks after drilling. (some straps and clecoes
removed already). |
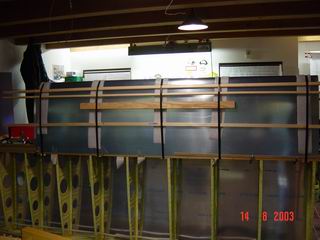
 With the
top main and leading edge skin clecoed on, it's time to
fit the tanks. My tanks are assambled by Evan Johnson, he
builds them and they are ready to go, no messy pro-seal
here. Of course you have to fit them to your wings, so
the tank skin is oversized and you have to file it down
to fit your main skins, but thats no problem. You can't
go per manual here, because normally you fit the LE skin
and tank skin at once, here you have the tank as a given
part and must fit the LE skin to it, this will be a
little more work for you, but I think it's much better
than these pro-seal parties. Visit Evans website, if you
want to let Evan do the job. It's fine craftmanship and
it's worth the price. If you you order your wings, Van's
will ship the nec. pieces to Evan and he sends the tanks
back to Vans, so they ship them to you as part of the
kit. With the
top main and leading edge skin clecoed on, it's time to
fit the tanks. My tanks are assambled by Evan Johnson, he
builds them and they are ready to go, no messy pro-seal
here. Of course you have to fit them to your wings, so
the tank skin is oversized and you have to file it down
to fit your main skins, but thats no problem. You can't
go per manual here, because normally you fit the LE skin
and tank skin at once, here you have the tank as a given
part and must fit the LE skin to it, this will be a
little more work for you, but I think it's much better
than these pro-seal parties. Visit Evans website, if you
want to let Evan do the job. It's fine craftmanship and
it's worth the price. If you you order your wings, Van's
will ship the nec. pieces to Evan and he sends the tanks
back to Vans, so they ship them to you as part of the
kit. |
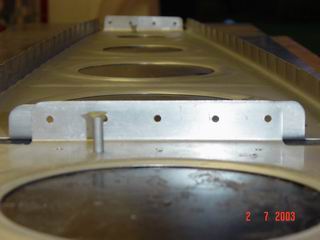
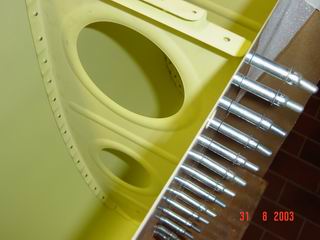
 It's hard
to see, but here is the problem with the tanks: In fact,
it is a problem with the spar.. . It's hard
to see, but here is the problem with the tanks: In fact,
it is a problem with the spar.. .
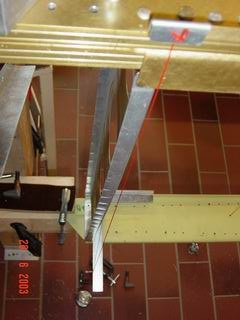
There are two rows of screws, attaching the tank to the spar. One line ofanchor nuts is riveted to the spar channel and the other one to a U-channel that's riveted on top of the spar. This U-channel is part of the Phlogiston spar and on my spar it was riveted on out of the spars centerline. When I fitted the tank there was a gap between the tank skins overhang on one side as a too close fit on the other side, 1/5 of an inch.....the tank was pulled out of CL because of the poor fitting of the U-channel, and this phenomenum occured on both wings. To top this, the joint plate was'nt evenly out of CL, no, inner side a little, outside a lot. So what to do? There is no possibility to reshape the U-channel, it is riveted to the spar and it would weaken the whole spar if you try to drill out these huge rivets. So I had to shim the whole buttjoint on one side and rebent the tank overhang on the other side to make it fit. The problems is maybe hard to understand if you did'nt built one of these wings, but I was extremely disappointed by this poor craftmanship. They must have jigs to drill these spars, and I really don't understand how things like this happen. I'm not the only one with this problem, so watch your spars and measure twice before you get into this trouble. The spars were built some 15 years ago, maybe there is no problem any more.... |
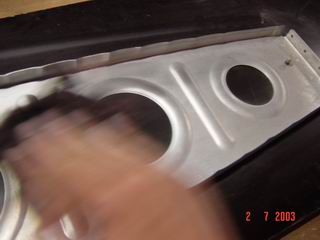
 This is
the #*%'#! U-channel, here you see the anchor nuts for
the upper row already installed and the holes for the
bottom row predrilled. There are some things on RV's
where you can see how patient the builder has been in
details, like the fit of the trim tab and all those
little things you can do fast or accurate, and the
tank-fit is definately one of those things, so I hope I
never meet that guy at Phlogiston that fabricated my
spars. The fix took 50 hours and you will detect it, of
course. '''''####'''' This is
the #*%'#! U-channel, here you see the anchor nuts for
the upper row already installed and the holes for the
bottom row predrilled. There are some things on RV's
where you can see how patient the builder has been in
details, like the fit of the trim tab and all those
little things you can do fast or accurate, and the
tank-fit is definately one of those things, so I hope I
never meet that guy at Phlogiston that fabricated my
spars. The fix took 50 hours and you will detect it, of
course. '''''####'''' |
 Here you
see the shim screwed to the spar. Of course it will be
riveted together with the main skin. This was only for
alingnment, I had to backdrill the holes because the
holes in the spar were already there. Here you
see the shim screwed to the spar. Of course it will be
riveted together with the main skin. This was only for
alingnment, I had to backdrill the holes because the
holes in the spar were already there. |
 This strip
must be riveted together with the LE skin, this is where
the tank butts against the LE and is attached with
screws. I had to shim this, too, to achive a smooth
transition to the already shimmed bottom line......a lot
of fun. This strip
must be riveted together with the LE skin, this is where
the tank butts against the LE and is attached with
screws. I had to shim this, too, to achive a smooth
transition to the already shimmed bottom line......a lot
of fun. |
 But it
payed off! The transition from leading edge skin to tank
skin. The tank skin is slightly thicker than the LE skin,
but it's hard to see after assembly. I don't know how
often I put the tank on and off and on and off again, but
at last I was really good ;o) But it
payed off! The transition from leading edge skin to tank
skin. The tank skin is slightly thicker than the LE skin,
but it's hard to see after assembly. I don't know how
often I put the tank on and off and on and off again, but
at last I was really good ;o) |
 There are
some holes you can't dimple, so you have to countersink
them. This will happen everywhere, it's the same with the
ailerons, flaps and so on. NEVER, NEVER countersink these
holes without a support for the pilot, clamped securely
under the predrilled hole, or you will get eggshaped
or/and starshaped holes. This is very important, try it
with some scratch and you will see what I mean. There are
some holes you can't dimple, so you have to countersink
them. This will happen everywhere, it's the same with the
ailerons, flaps and so on. NEVER, NEVER countersink these
holes without a support for the pilot, clamped securely
under the predrilled hole, or you will get eggshaped
or/and starshaped holes. This is very important, try it
with some scratch and you will see what I mean. |
 The
nutplates near the root of the wing are very close to the
reinforcing bars of the spar, so I decided to take these
90degree nutplates instead, the ordinary ones will be
hard to rivet here. The
nutplates near the root of the wing are very close to the
reinforcing bars of the spar, so I decided to take these
90degree nutplates instead, the ordinary ones will be
hard to rivet here. |
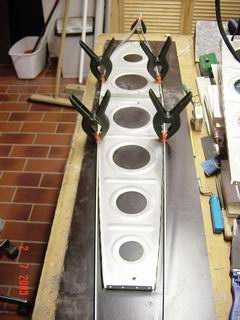
 Once the
tank fits the wing, it is time to rivet the LE skin to
the ribs. That's done by simply taking off the whole
assembly in one piece. Before that you have to deburr,
dimple, prime and reassemble, but we can ommit these 15
hours ;o) Once the
tank fits the wing, it is time to rivet the LE skin to
the ribs. That's done by simply taking off the whole
assembly in one piece. Before that you have to deburr,
dimple, prime and reassemble, but we can ommit these 15
hours ;o) So you put the LE in a cradle and rivet the ribs to the skin, trying not bounce around with that bucking bar and put some additional dings on that shiny surface. In my opinion this is one of the easier things to rivet because you have perfect access, no problems here. |
 A look
inside: Top side done, bottom side is next. A look
inside: Top side done, bottom side is next. |
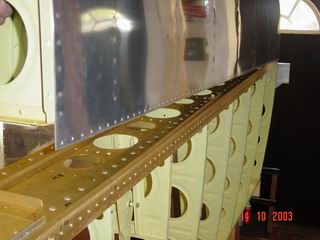 Now you
take the riveted nose back to the wing and rivet and bolt
it on. You reach through the lightening holes in the spar
to insert the bolts, these go right through the spar and
the main ribs. The row of rivets along the spar can be
riveted with a hand rivet squeezer. Now you
take the riveted nose back to the wing and rivet and bolt
it on. You reach through the lightening holes in the spar
to insert the bolts, these go right through the spar and
the main ribs. The row of rivets along the spar can be
riveted with a hand rivet squeezer. |
 Slip on
the tank and it looks like a wing, but only the top side.
Now you can fit and drill the bottom main skins. Slip on
the tank and it looks like a wing, but only the top side.
Now you can fit and drill the bottom main skins. |
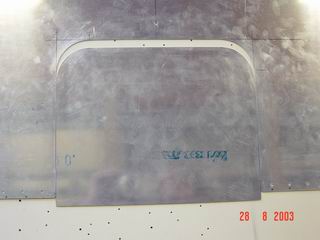 Here you
have to build an inspection cover to get access to the
aileron bellcrank assembly. This is fun! Of course you
can't take the piece you've cutted out, it is too small,
so you have to fabricate a piece that fits inside the
cutout with nearly zero tolerance... Here you
have to build an inspection cover to get access to the
aileron bellcrank assembly. This is fun! Of course you
can't take the piece you've cutted out, it is too small,
so you have to fabricate a piece that fits inside the
cutout with nearly zero tolerance... |
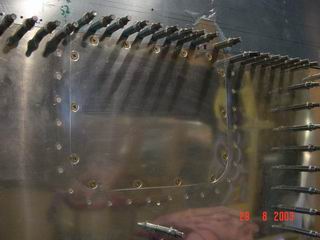
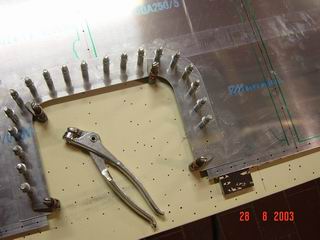 ...cut out
and rivet in a rear-support, install some nutplates.... ...cut out
and rivet in a rear-support, install some nutplates.... |
 ...and it
looks like this! ...and it
looks like this! |
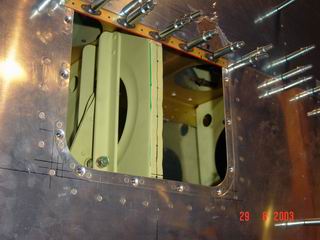
 And
finally this. I love these things: A clear task, some
hours of work and done. And
finally this. I love these things: A clear task, some
hours of work and done. |
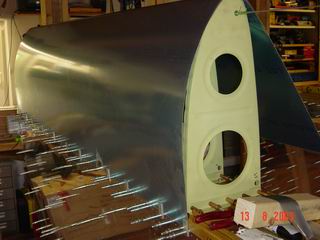
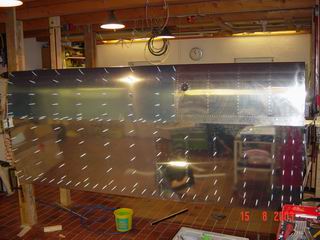
 All skins
are fitted, now its time to rivet on the top main skins.
Here you need a good bucker... All skins
are fitted, now its time to rivet on the top main skins.
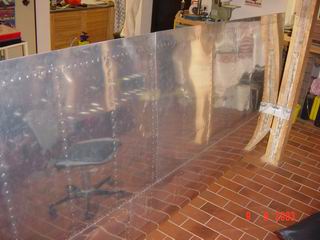
Here you need a good bucker...This is a big day, this side really looks like a wing, no cleco left and you hear the sound of that big Lycoming and...you got the picture.... |
 ...but,
the other side: Hmmm ...but,
the other side: HmmmYou can't close the wing now, because there are no flaps and ailerons by now, and you have to fit them and drill and rivet all the attachments for these before you can rivet the bottoms skins, so jump to the aileron/flap section... |
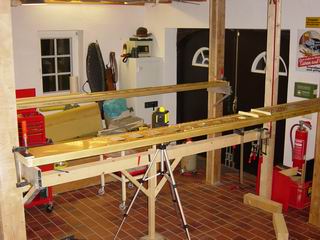
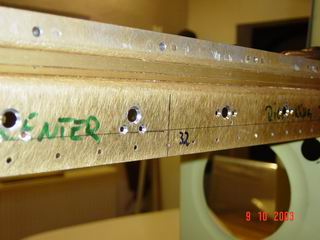
 I have the prebuilt phlogiston spars, so I
had no work with them at this stage, but later..... Here
the spar is leveled in the jig, so you can straighten all
main ribs, drill out the lightening holes (Günther did
that luckily), fit the ribs to the main spar, cut and
drill the reinforcing angles to most of the ribs, and
finally drill the ribs to the spar. Here you see the
innermost rib clecoed to the main spar and a plumb bob
hanging down. This one shows where to drill it to the
rear spar. Alignment of main and rear spar is done with
another pair of bobs going right through both spars at
positions called out in the manual. Any mistake here will
show once the skins are riveted on, so do it exactely.
Asking why I know that?....
I have the prebuilt phlogiston spars, so I
had no work with them at this stage, but later..... Here
the spar is leveled in the jig, so you can straighten all
main ribs, drill out the lightening holes (Günther did
that luckily), fit the ribs to the main spar, cut and
drill the reinforcing angles to most of the ribs, and
finally drill the ribs to the spar. Here you see the
innermost rib clecoed to the main spar and a plumb bob
hanging down. This one shows where to drill it to the
rear spar. Alignment of main and rear spar is done with
another pair of bobs going right through both spars at
positions called out in the manual. Any mistake here will
show once the skins are riveted on, so do it exactely.
Asking why I know that?....